Bookmark and Share

Sunday, December 23, 2012

Hanging Ornament Decorated Bag

Super simple gift bag made recycling a paper bag and left over gift wrap or magazine pages and glitter glue

Items used:
  • Paper sack
  • Scraps of gift wrap or magazine pages
  • Scissors
  • Glue Stick
  • Pen or pencil
  • Glitter glue
  • Round object
 I used small paint bottle for the round object and drew around it on scraps of wrapping paper, cut it out, applied glue stick to the bag then stuck it on the bag at different points on the bag.


Use the glitter glue (I used silver) to make a small dot at the top of the ornament for the shank and then draw lines up to the top.  Allow to dry and it is ready for gift insertion.


Saturday, December 22, 2012

Funky Reindeer Package Wrap


This is a version of Risque Reindeer my son came up with a few years ago (see below).  Instead of using a paper bag, I used the packaging the gift was mailed to me in, pulled off the sticker, cutout out the antlers, eyes lips and "jewel" from a magazine, used red glitter glue for the nose and silver glitter glue for the chain on the necklace and a bow I saved from last year.

    
See Risque Reindeer Gift Bag and 1000's of others - or share your own on Cut Out + Keep

Friday, December 21, 2012

Recycled Christmas Card Gift Bag

A fun way to upcycle a Christmas card to a pretty gift bag.

Every other year or so around Christmas we go to a family get together to play bingo and everyone brings small prizes around a $1 or so in value and I hate to pay a lot for the wrapping so I save small paper sacks (or you purchase them for around $4 for 50) decorate them. 

Items needed:
  • Used Christmas Card
  • Paper Sack
  • Scissors
  • Glue stick
  • Glitter Glue
  • Tape
1)  Cut the back off of the Christmas card (which the back can be saved to make gift tags) .

2)   Liberally apply glue stick to the back side of the front of the card and press firmly on the paper sack.

3)  Scribble glitter glue around the edges of the card


Friday, December 7, 2012

Stoned Picture Frame

 This is another version of the Stoned picture frame that I made here, except I used red spray paint on the dollar store frame and only 8 of the clear stones.

Sunday, November 25, 2012

Stoned Picture Frame


These are based on a tutorial over at  Ruffles and Stuff for "Easy Fancy Pants Frames" and we made them previously  here.   They are inexpensive and very easy to make and add panache to a plain frame.

The only thing that is a bit different is I didn't find a frame in pink at the dollar store and used some hot pink spray paint I had on hand.   

  •  Picture frame (with an edge wide enough to hold the stone you are going to glue on
  • Small clear decorative stones
  • Amazing Goop or other strong, clear glue
  • Spray Paint
  • Newspapers

- Put down newspapers

-Spray the frame with paint, allow to dry

-Check for missed spots, spray again, allow to dry

- Position stones on frame then glue down.

-Leave frame flat until glue is dry.

- Place picture in frame and it is ready for gift-giving.


The photo was Walgreens using their free software to create a collage and you can select up to 20 photos for the collage, but I only used 10 for the above.  I ordered it during a promotion and it was free, but the code has now expired.  From time to time they do offer this special and it usually posted on their photo home page.

http://30minutecrafts.com/2013/05/craft-lightning-week-2.html#utm_source=feed&utm_medium=feed&utm_campaign=feed

Tuesday, November 20, 2012

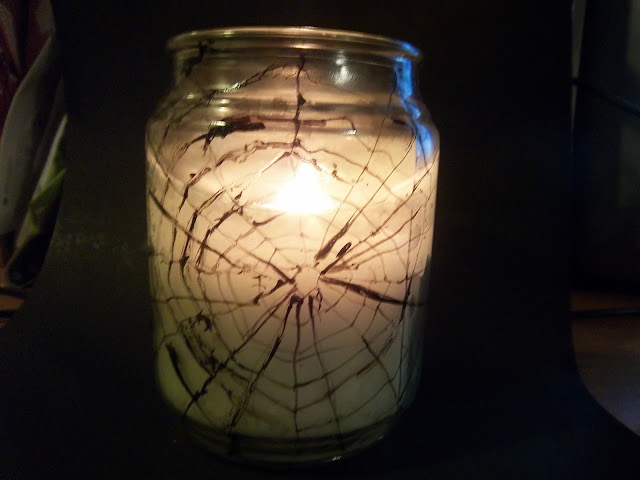
Spiderweb Candle


This is just a "Better Homes and Gardens" candle that I purchased at Walmart for $4.98.   It is a light green color and the scent is "Chocolate Peppermint Truffles".

I peel the label off and started by drawing a rough polygon shape in the center, draw lines out from it the go around the polygon in small increments to larger increments all the way around.  I used a Porcelaine 150 fine tip ceramic paint marker on it as it is what I had on hand.

I like the idea because it does look eerie in a dark room, but perhaps a black sharpie or acrylic paint might work better and give you better control.   I might try this next with glow in the dark paint instead.   The Porcelaine paint marker is to be used specifically on glass but I have always gotten splotchy results with it even though this is a fine tip marker.

Thursday, October 18, 2012

Blazing Black Nails

In honor of Halloween, and also because I don't think there are enough different types of black nail polish on he market, I created this look using 2 coast of black nail polish as the base (I used Sinful Colors "Secret Admirer" and 2 coats gold and red glitter nail polish on top (I used Sinful Colors "Pumpkin Spice". 

I know it is hard to tell by the picture, but the color looks different depending on how the light catches it, sort of like a burning fire.

Saturday, October 13, 2012

Fleece Lap Blanket and a Fleece Project Roundup

This is just a quick and simple lap blanket made with two pieces of fleece and for under $8. 


I went to Hancock Fabrics as I needed to pick up sewing machine needles and had a 40% of notion item from their flier when I spotted the tiger print above on the $3 a yard remnant table and it turned out there was 1 1/4 yard and I dug through and found the black piece that is on the back and there was 1 2/3 yard.  I knew this would be perfect to make a lap blanket to put over my lap this winter while at the computer as the desk is near the front door and always cold in that area.

I didn't take pictures as I went as it is so simple you really don't need any.  I pinned right sides together on three sides and instead of cutting the black piece down to size I folded it over at the top and pinned the edge right sides together and stitched all the way around except leaving and opening around 6 inches wide at the top.  I then turned it right side out and stitched the opening shut and it was done in less than an episode of the X-Files.

Hancock Fabric is also having its "Fleece Fest" right now has most of their fleece fabrics on sale for $3.99 a yard, which would be great to make an inexpensive Christmas present like the above blanket, or here are some other projects that could be made:


See Laptop Sleeve and 1000's of others - or share your own on Cut Out + Keep


See Easy No Sew Fleece Poncho. and 1000's of others - or share your own on Cut Out + Keep


See Appa Pillow Pet and 1000's of others - or share your own on Cut Out + Keep 


See Baby   Bear Blanket and 1000's of others - or share your own on Cut Out + Keep


See Fleece Dino Hat and 1000's of others - or share your own on Cut Out + Keep


See Easy Fleece Scarves and 1000's of others - or share your own on Cut Out + Keep


See Cloak and 1000's of others - or share your own on Cut Out + Keep


See "Swiffer" Dusters and 1000's of others - or share your own on Cut Out + Keep


See Super Cute Panda Sleep Mask and 1000's of others - or share your own on Cut Out + Keep


See Remote Control Organizer and 1000's of others - or share your own on Cut Out + Keep


See "nuggie" Knock Off and 1000's of others - or share your own on Cut Out + KeepS

  Cart baby blanket


Halloween Fleece hats (fun for dress up play too!)


Fleece Flower Pillows


See Warm Fleecy Scarf With Beaded Fringe and 1000's of others - or share your own on Cut Out + Keep

   
See Easy Gift To Make   No Sew Fleece Lap Blanket and 1000's of others - or share your own on Cut Out + Keep


See Fleece Fox Scoodie and 1000's of others - or share your own on Cut Out + Keep

   
See Fleece Bunny Hat/Scarf :D:D and 1000's of others - or share your own on Cut Out + Keep


Seatbelt Snuggies


Sunflower pillow


Sew your own Pig and piglets!

Fleece Socks


No Sew Fleece Lion Pillow 


See Warm Cape "Gaban" Style and 1000's of others - or share your own on Cut Out + Keep


Sunday, September 30, 2012

Countdown To Halloween Begin Tomorrow!

Again this year I will be a Cryptkeeper and participating in Countdown to Halloween
at Unique Unusual or Interesting and plan on posting something new every day during the month of October and hope that you will stop by for a visit and check out all of the other participants also.  

I will be posting here also non-Halloween items as my schedule allows:)

If you are interested in participating, you can email universalrobots@aol.com to be put on the roster (but he will only email you back if there is an issue as there are so many participants).

Sunday, September 16, 2012

Cake Mix Jello Cookies

Combine two favorite desserts into one fun quick and easy treat!

 I had seen this recipe for Jello cookies but decided to try a quicker and easier route.  They turned out a bit heavier than regular cookies but still tasted light and cakey with a slight taste of the Jello flavor (this is the 2nd batch; the first one was devoured before I was able to take pictures of them).

In choosing a cake mix, consider the Jello flavor you want to combine it with and the color of cookies you want to try to achieve.  For the above I used yellow cake, orange Jello and orange juice.  For my first batch I used a white cake mix, blue Jello and water and they came out a lovely light blue color, but less flavor so I used juice in this batch.

Recipe:
  • 1 box cake mix
  • 1 3oz package of Jello
  • 1 egg
  • 1/4 cup oil
  • 1/4 juice or water
  • Baking parchment paper or non-stick coating spray.
Preheat the oven to 350 degrees.   Line a cookie baking tray with baking parchment paper or spray with non-stick coating.

Mix all ingredients, drop by heaping tablespoons onto cookie sheet and bake 8-15 minutes.

The size of your "heaping tablespoons" determines how many cookies you end up with, but I ended up with 24 using smaller (baking 10 minutes) and 18 using huge tablespoons (baking 15 minutes).

Happy Crafting!

Monday, September 3, 2012

Saving Money on College Text Books

In getting ready for classes, we found that if we had paid full price for all of the books that he needed for college it would have been several hundred dollars, but instead we were able to find used books to purchase online for under $100 and I thought I would share some of the tools and tips that we used.


1.  Decide if you want to buy or rent
If you can, flip through the book at the campus bookstore or library before making a decision and see if the book would be a good reference for future classes or in the field of study.   If so, it would probably be a better deal to buy it.

If it is not something that will be used or referenced, renting might be the right direction, but be sure to compare costs; sometimes you can buy a used book in good condition for much cheaper than you can rent it.
2.  If more than one edition, check to research the book online
If the book has several editions, check comments online and also check with the teacher to find out if a prior edition could be used.   On the example, a new copy of the 5th edition was $180, a used copy $110+ and to rent around $75.   The only difference between the 4th edition and the 5th is the cover page an few pages added to the 5th and his teacher approved using the 4th edition when asked.  We purchased the 4th edition under $40 used, which includes expedited shipped saving us $140.


3.  Check Finders Cheapers
Finders Cheapers is a site that not only pulls up the prices and compares prices of different text books (you can search by name, author or IBN #) it also pulls up current discounts and the shipping cost to rent or buy.

By using this tool we saved $32 on one book that was needed.


4.  Check Half.com and Ebay
Although we didn't find cheaper options using these services, I would recommend checking out  Half.com and Ebay.com as it might be possible to get a book cheaper off a student that no longer needs or wants the book.  If you do, remember to   be sure to check out the sellers feedback rating and how long it will take to ship.

If anyone else has any other suggestions, please feel free to post them in the comments section:)

Saturday, August 25, 2012

Dylon Permanent Fabric Dye - Disappointing Results


I purchased the above obnoxiously bright coral skirt on sale at Target for around $5 after a coupon as I liked the look (but not the color) and used a coupon for 40% off one item at Hobby Lobby to buy Dylon Permanent Fabric Dye in Intense Purple as I had not tried the brand before and I liked the color.

I processed as directed on the package but very unhappy with the results.  I am well aware that unless you start with a white garment it is hard to tell what the end result will be and you also have to take into consideration the content of the fabric; cotton will absorb color but other items, especially polyester, may not take as well or at all.   As the skirt is 100% cotton I did expect it to absorb the color and expected a much darker result than I achieved.

Additionally, you can only dye 1/2 pound of fabric in a 4 cup mixture of water/dye, which is half of other dyes I have used, such as RIT, where it takes one box for one pound of fabric, which makes this product double the price.

Sunday, August 19, 2012

Flour's Famous Banana Bread


A great way to use up over-ripe bananas!

I had several over-ripe bananas so I went in search of a new banana bread recipe to try and found this recipe one on the Food Network site and was on an episode of Giada's Weekend Getaways.  The recipe itself byChef Joanne Chang, owner/chef of Flour Bakery in Boston. 

An interesting note about Joanne is that she left her management consulting career after graduating with an honor degree from Harvard with a degree in Applied Math and Economics to pursue her baking passion.  

I found this cake to be very moist and addictive and is more a banana bread for a non-banana bread loving person as their is only a hint of the banana flavor and it is only slightly sweet and is great with a warm cup of tea.

Ingredients:
  • 1 2/3 cups flour
  • 1 teaspoon baking soda
  • 1/4 teaspoon ground cinnamon
  • 1/2 teaspoon salt
  • 1 cup plus 2 tablespoons sugar
  • 2 eggs
  • 1/2 cup oil
  • 3 1/2 bananas, very ripe, mashed
  • 2 tablespoons sour cream
  • 1 teaspoon vanilla 
  • 2/3 cup walnuts
  • Parchment paper
Preheat oven to 350 degrees.

Line the bottom of the baking pan with parchment paper.  I used a 9x9 cake pan instead of a bread pan to be able to get more servings by cutting the loaf in half and then into slices.
To toast the walnuts, put on a cookie sheet or baking dish and toast for 8-10 minutes while you are combining the other ingredients.


Sift together the flour, Baking Soda, Cinnamon and salt in a large bowl.


In another large bowl, use a mixer beat sugar and eggs (with a whisk attachment if you have one) until light and fluffy, about 10 minutes. Yes, 10 minutes. 

Then mix in the oil, mashed bananas, sour cream and vanilla


The original recipe advises to fold dry ingredients and nuts into the above, but I didn't think my bowl was big enough so I slowly mixed the wet ingredients into the dry one instead.


Pour the mixture into the baking dish with the parchment lining the bottom and bake for 45 minutes to 1 hour.   Using the 9x9 pan, it took 1 hour in my oven before it was done in the center.

Allow to cool and cut into slices.  If using a 9x9 pan, cut down the middle and into slices:)

Thursday, August 9, 2012

Pasta Alfredo

The sauce has a bit of a nutty flavor from the nutmeg, a bit of tangy flavor from the lemon, and combined with the other ingredients is a filling main dish "comfort" food.

 Ingredients:
 (Start cooking both pasta and sauce on separate burners at the same time)
  • 16 oz pkg of bow tie pasta
    Cook to Al dente (usually 2 minutes less than indicated on the package) in boiling salted water, drain.

    Alfredo Sauce:


  • 3/4 cup half and half 
  • 3/4 cream cheese
  • 1/2 tsp lemon juice
  • 1/4 tsp nutmeg
  • 1/4 tsp. garlic
  • 1/2 tsp of garlic salt
  • 1/4 tsp  pepper 


    • Garnish - Ranch Tortilla Chips (optional)
    Put all ingredients in a saucepan and cook on medium heat for approximately 15 minutes until thickened.  Pour over pasta.   If desired, garnish with Ranch flavored tortilla chips (which can be crumpled on the top to add texture and flavor) then serve.

    Linking up to Presto Pasta Night which is hosted on 8/17/12 by Simona at http://briciole.typepad.com/.
    Be sure to check out all of the other wonderful pasta creations by other participants:)
    Presto

    Friday, August 3, 2012

    Dress from 3 T-Shirts


    This is a good way to use t-shirts that might have an imperfection, stain or logo on them but with the majority of the fabric useable to make a color block t-shirt dress.

    The measurements for the dress that I made are for a Girls size 2-3, but could easily be adapted to any size.

    Items used:
    • 3 T-shirts
    • T-shirt or tank top that fits
    • Paper and pen
    • Straight Pins
    • Sewing machine
    • Coordinating Thread
    • Iron
    • Scissors
    • Ribbon or double fold bias tape (I used 1 1/2 yds for this size)
    • Safety pin 
    • Measuring tape or ruler
    All seams are 1/2 inch wide

    For the top part of the dress it would be best to use the bottom part of t-shirt that fits or is slightly larger.

    Use the T or tank to that fits as a template to make a pattern - measure from the front neckline to under the bust and add 2 inches for the horizontal measurement.


    Fold the t-shirt you are using for the top in half, flip upside down and line up the pattern with the bottom of the shirt and cut out an armhole on the non-folded side (the bottom of the t-shirt will be where you thread the ribbon.).  

    Turn the area in the armhole under 1/2 inch and press. Stitch down on all sides.  Stitch sides together.


    For the middle part of the shirt measure from under the bust to the waistline and add 1 inch for for the horizontal measurement.

    For the width, angle down slightly so is is wider at the bottom.


    Pin and stitch to the top part of the dress.


    For the bottom part measure from the bottom of the waist to the length that you want the dress to be and add 1 inch for seam allowances and hem.

    The width should match the bottom width of the slightly angled middle piece.


    Turn under 1/2 inch at the bottom and top stitch the hem down.  Pin and stitch the bottom to the middle part

    For the ties, thread the ribbon through one shoulder in the back to the other side using a safety pin and then around to the front and thread through to the other side to tie in a bow.


    Happy crafting:)

    Linking up to:

    Sunday, July 29, 2012

    Mud Puddle Splasher Boys Shorts

     This project is for a July charity sewing project at Hopeful Threads to make little boys short.
    I chose to make a Size 7/8.    I bought the soccer fabric at Hancock Fabric's today on sale for $2.09 a yard.

    I haven't made a boy's pair of shorts since my son was a toddler (he is now a high school graduate) so thankfully the project was a simple one.   I was able to complete this while watching two hour long television shows.

    Items used:
    • 1 yd fabric
    • Scissors
    • Glue Stick
    •  Straight pins
    • Sewing Machine and thread
    • Iron
    • 22 inches of 3/8 inch elastic

    I used the free pattern and instructions for the Mud Puddle Splasher Shorts (through end of July if you agree to make a pair for donation) at Fish Sticks Design.   I printed off the instructions and pattern then pieced the pattern together using the glue stick.  To the left is what it looked like pieced together. 


    I decided to make the option without the faux fly front and with pockets, so I only ended up using 3 pieces.

    In opened up the fabric and folded each side toward the center and laid out the fronts (cutting 2 pieces) and pocket (cutting 4 pieces) and the backs (cutting 2 pieces) on the other side.

    I followed the remaining instructions with the exception of the elastic; I used 3/8 inch as that is what I had on hand instead of the 1 inch in the original project. 


    Shorts Button


    Also linking up to: